Tuesday 29 April 2014

Today You will learn :


  • How to set environment variable for Java
  • How to Run Java from Command Prompt
  • How to Compile Java code from Command Prompt


Before Starting You must check if  JDK is installed if not download install it from oracle's official website.

Lets get Started :


  • Click Advanced System Settings under Computer Properties
  • Click Environment Variables
  • Create a New one with the name path
  • Go to the bin in the JDK installation directory and copy the path
  • Now paste this path as the Variable Value and click ok


Check :


  • Open Command Prompt
  • Type javac and press enter
  • Alot of junk will Appear below

    Like our Facebook Page for more!!!

Monday 14 April 2014

Things you will learn :

  • What are Headers
  • How to create Headers
  • Why should i create Headers
  • How to include header in your program

What are Header files?

  Header files are similar to the library files in Java. They are created once and can be used in any program in which they are included. Actually you define your functions in the header files to use them again and again without typing the whole code again. All you have to do is to include them in your program first. The most common header files in C/C++ is"conio.h" inside this header some functions are defined which are used to perform actions on console screen.

Create Header Files

Creating a Header file is not difficult at all here is the step by step method:
  • Open Notepad
  • Create your function definations there
  • Open the folder where you compiler saves its Header Files
  • For turbo C++ its in C drive --> TurboC++ --> Disk --> TurboC3 --> INCLUDE 
  • Save the file with ".h" extension  in INCLUDE folder
Congrats You have created a header file. Now you just have to include your header file in your program and check if its working in the way you want it to. You can include the file like this #include<headerfilename.h.>. There should be no errors if you followed the step by step method above.

Here is an Example :


Save this code as "sum.h" in INCLUDE directory.
 int sum(int num1,int num2){  
 return (num1+num2);  
 }  
Now include the header file in the program like this:
 #include<stdio.h>  
 #include<conio.h>  
 #include<sum.h>  
  void main(){  
   clrscr();  
   printf("%d\n",sum(5,5));  
   getch();  
  }  

Explanation : 

In the header file i have defined a function which takes two numbers as parameters and returns their sum. And in my program i just included header file(#include<sum.h>) and called the function which i defined earlier in my header file(printf("%d\n",sum(5,5))). The output is 10.

Today i discussed probably the easiest way of creating the header files. If you know even easier method than that. Share it with others in the comments below. And if you like this post Share it with your friends and Subscribe for more :)


Tuesday 8 April 2014

Today You will learn :

  • How to use Inner Class to use Key Events and Mouse Events
  • How to cancel key typed event in Java
  • How make numeric JTextField
  • How to limit the number of characters in JTextField
  • consume() method of the KeyListener interface
  • Character.isDigit() method and getKeyChar() method

The main things here are the JTextField , KeyEvents , Inner Classes in Java and how to create numeric TextFields in Java and if you want numeric text box in C# Click Here 

How to use Inner Classes to Implement KeyEvents?

 When i first used inner classes i really avoided them because they a bit complex. But trust me Inner classes are'nt that difficult as they are thought to be. Here's how its done :
  • Create a private inner class
  • Use the implement keyword to implement the KeyListener interface
  • Override all the methods of the interface KeyListener
  • Create the Object of the Inner Class in the enclosing Class like that "InnerClass i = outerclassobject.new InnerClass()"(you have to create outer class object first)
  • Add the object of inner class to the object of component class which you want to implement KeyEvents for example "JTextField.add(KeyListenerObject)"

Here is the code:


 import javax.swing.*;  
 import java.awt.event.KeyEvent;  
 import java.awt.event.KeyListener;  
   
 public class NumericBox{  
      static JTextField tf = new JTextField();  
        
      public static void main(String arh[]){  
             
           NumericBox g = new NumericBox();  
           Handle h = g.new Handle();  
           JFrame f = new JFrame();  
           JPanel p = new JPanel();  
             
           tf.setColumns(5);  
           tf.addKeyListener(h);  
             
           p.add(tf);  
             
           f.add(p);  
           f.setSize(200, 200);  
           f.setVisible(true);  
             
      }//end of main method  
        
      private class Handle implements KeyListener{  
   
       public void keyTyped(KeyEvent e) {  
           if(tf.getText().length() == 6)  
                     e.consume();  
                       
           if(e.getKeyChar() != 13 && !Character.isDigit(e.getKeyChar())   
                && e.getKeyChar() != 42 && e.getKeyChar() != 43   //key codes of the keys
                && e.getKeyChar() != 45 && e.getKeyChar() != 46   //you want to enable
                && e.getKeyChar() != 47)  
                     e.consume();            
           }  
   
           public void keyPressed(KeyEvent e) {}  
           public void keyReleased(KeyEvent e) {}  
             
      }//end of inner class  
        
 }//end of outer class  


Output:

Explanation : 

                   In the keyTyped method of the inner class at  I have checked if the the characters typed in the text field is equal to 6 then the key event is canceled by using the consume() method in the this way i have restricted from entering more than 6 character in the text field.  To restrict the user to enter digits only i have used Character.isDigit(e.getkeyChar()). e.getKeyChar() returns the ASCII code of the key pressed here if the key pressed do not represent a digit the key event is canceled similarly i have enabled several other keys using ASCII code if you don't know the ASCII code of keyboard keys CLICK HERE.

I hope You have learned Something from this post if have any suggesions for me contact me at daniequreshigmail.com or comment below And Follow Me for more stuff!!!


Thursday 3 April 2014

What You are About to Learn?


  • Array Reversing
  • Java String.charAt(index) method
  • String Reversing
  • StringBuilder
  • StringBuffer.reverse() method in Java
  • Java String.toCharArray() method


String Reversing Method # 1 : 
 public class StringReversing {  
   public static void main(String args[]){  
   char temp;  
   String s = new String("Hello");  
   System.out.println(s);  
   char str[] = s.toCharArray();  
   int last = s.length() - 1;  
   for(int first = 0; first < s.length()/2; first++){  
      
   temp = s.charAt(first);  
     
   str[first] = str[last];  
   str[last] = temp;  
     
   last--;  
   }  
   s = new String(str);  
   System.out.println(s);  
  }//end of main  
    
  }//end of class  


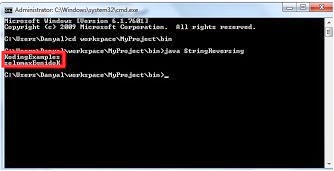
 OUTPUT :

Explanation : In line number 06 i have used the String.toCharArray() method to store the converted(to array of characters) value of the  string in Array of characters "str" .
charAt(index) is the build in method in Java String it simply returns the character at the index "index"(index is an integer) it can not be used to assign the value For example i cant do this  s.charAt(0) = 'c' . At line #10 the value of first character of the "str" is copied in the variable temp. In 1st iteration of the loop the first char in "str" is replaced by the last and last is replaced by the first one. 

       Similarly in second iteration of the loop 2nd character is replaced by second last and vice versa. This process will carry on until the whole Array is reversed. And at the end the result is printed in line #18.


String Reversing Method #2 :
 public class StringReversing {  
  2   
  3 public static void main(String args[]){  
  4    
  5   String s = new String("Hello");  
  6   StringBuffer sb = new StringBuffer(s);  
  7   System.out.println(s);  
  8    
  9   sb.reverse();  
 10    
 11   s = new String(sb.toString());  
 12   System.out.println(s);  
 13 }//end of main  
 14   
 15 }//end of class  


Output will be the same.

Explanation :  Here i used StringBuffer. I saved the string in the StringBuffer. Then i used the reverse(reverse method is build in for StringBuffer) method for StringBuffer to reverse the it. At the end i copied the saved the converted(to string) value of StringBuffer in the string value and displayed it.

Share other methods which you find useful too!!


I Hope You Learned Something from this Post if you have any problem comment below i will reply as soon as possible, FOLLOW Me for more Good Stuff :) 


Tuesday 1 April 2014

Why to make a TextBox numeric ?
  
Imagine the situation in which you are making a calculator app and if the user types chars except digits that may result in undesired output. A wise programmer will not let that happen and he will restrict the user to type only numbers so that the chance of user mistyping is eliminated. 
     
    Today i am going to tell you how to make numeric textbox and other useful stuff you can do with textbox
    Here is the code :


  private void textBox1_KeyPress(object sender, KeyPressEventArgs e)   
    {   
     if (!(e.KeyChar >= 48 && e.KeyChar <= 57 && e.KeyChar != 8))   
      e.Handled = true;   
    }   

     "textBox1_KeyPress" method is called every time a key is pressed inside the "textBox1". Inside the method there is an if which checks  weather or not ASCII key Code of the key pressed by the user is greater or equal to 48 and less than or equal to 57 if both the conditions becomes true then the corresponding character appears in the "textBox1" if not then the "keyEvent" is cancelled. KeyEvent is cancelled by setting "e.Handled = true;".

 You can restrict your textbox to accept only the keys you want it to accept for this you need to know  ASCII values for keyboard keys.
  If you don't know the ASCII values for keyboard keys you can check them HERE

 There is another method for doing this which is a bit easier for beginners :

  private void textBox1_KeyPress(object sender, KeyPressEventArgs e)   
    {   
     if (!char.IsDigit(e.KeyChar) && e.KeyChar != 8)   
      e.Handled = true;   
    }  

   In this case whenever the user presses the key C# checks weather or not the key pressed by the user represents a digit if the key represents a digit the key event goes fine but if not then the key event is cancelled. The other thing you have to do is to enable the backspace button by using its ASCII value.


Other useful textbox Properties

You can make your textbox secure by using the PasswordChar property you can set the PasswordChar to any char and when you type in the textbox the digits are hidden and password char is diplayed instead. This is useful in many situations for example if you are creating the facebook login app you don't want anyone to see what you typed in password textbox.

You can set the maximum length of the characters the textbox accepts by setting textbox.MaxLength.

 If you want some different text color in the textbox you can use textbox.ForeColor property and you can do the same for Background as well. See which colors C# supports HERE.

Hope you Liked this FOLLOW Me for more!!!

Subscribe to RSS Feed Follow me on Twitter!